

Storms can damage a roof in obvious ways, such as by removing shingles or dropping tree limbs, but less visible damage can be just as important. Wind can loosen flashing, hail can leave impact marks, and heavy rain can find its way through a small opening near a vent, skylight, or roof edge.
Homeowners who are unsure, Will homeowners insurance cover the roof? should start by reviewing their own policy and the documented cause of damage. Coverage decisions depend on policy language, the condition of the roof, the cause of the loss, applicable deductibles, and other facts specific to the claim.
Why Storm Damage Can Be Hard to Spot
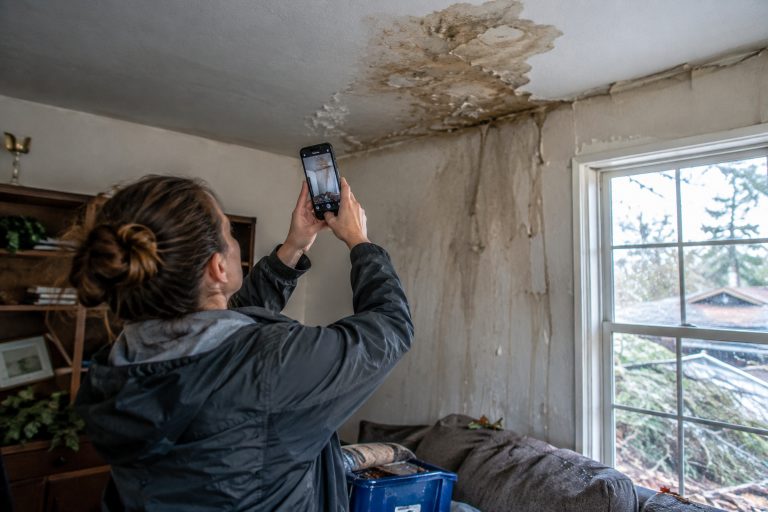
A roof may look mostly intact from the driveway, while water is already entering beneath lifted shingles or damaged flashing. Inside the home, watch for ceiling stains, bubbling paint, soft drywall, damp insulation, warped flooring, or a new musty odor. A small opening that goes unnoticed can allow repeated rainfall to affect framing, insulation, and interior finishes.
For example, several missing shingles may not cause an immediate drip. During the next hard rain, however, water may reach the roof deck or attic. That is why a careful inspection and a clear record of conditions are useful even when the damage initially appears minor.
Step One: Make Safety the First Priority
- Wait until lightning, strong winds, standing water, and other immediate hazards have passed.
- Keep children and pets away from fallen wires, broken glass, loose debris, and damaged trees.
- Do not climb onto a wet, unstable, or potentially weakened roof.
- Look for sagging ceilings, exposed wiring, large hanging limbs, or structural movement.
- Call emergency services if the property presents an immediate threat to people.
Homeowners can inspect visible areas from the ground, the attic, or upper-floor windows. Roof access, tree removal near structures, and concerns about structural stability should be left to properly equipped professionals.
Step Two: Document What Happened
Strong documentation helps create a timeline and gives contractors, insurers, and repair professionals a clearer picture of the condition after the storm. Take photos and videos before moving debris whenever it is safe to do so. The steps for inspecting, documenting, repairing, and confirming roof work also emphasize keeping records and reviewing contracts before signing.
- Photograph each side of the home, the roofline, gutters, siding, and outdoor structures.
- Capture close-up images of missing shingles, bent flashing, dented vents, branches, and visible holes.
- Record interior stains, wet insulation, damaged belongings, and affected flooring.
- Write down the storm date, approximate time, weather alerts, and any observed changes.
- Keep estimates, inspection notes, cleanup invoices, tarp receipts, and communication records.
Step Three: Check the Roof and Interior Areas
Exterior Signs to Look For From a Safe Location
- Missing, cracked, curled, or lifted shingles.
- Dents on metal vents, gutters, downspouts, or flashing.
- Loose flashing around chimneys, skylights, and roof edges.
- Branches or debris resting on the roof.
- Blocked gutters, damaged downspouts, sagging sections, or exposed roof materials.
Interior Signs of Possible Water Entry
- Brown or yellow spots on ceilings or walls.
- Peeling paint, bubbling drywall, or wet attic insulation.
- Drips around light fixtures, outlets, cabinets, or windows.
- Warped floors, damp materials, or new mold growth.
The absence of an obvious leak does not confirm that the roof is sound. Note any unusual condition and arrange a professional inspection if damage is suspected.
Temporary Repairs Versus Permanent Repairs
Temporary work is intended to limit further damage. It can include placing containers beneath an active leak, moving furniture away from water, or arranging professional tarping when the roof is exposed. Board broken windows only when it can be done safely. Photograph the condition first if possible, and retain receipts for emergency services and materials.
A permanent repair addresses the underlying damage, such as replacing compromised shingles, flashing, decking, or gutters. Avoid making broad alterations before the damage is documented and inspected, unless prompt action is necessary to protect people or prevent worsening damage.
How to Review the Insurance Policy and Report Damage
Before authorizing costly work, review covered causes of loss, dwelling and roof limits, wind or hail deductibles, replacement-cost or actual-cash-value terms, roof-age conditions, exclusions, and reporting deadlines. A contractor can explain needed work, but the insurer determines whether the policy applies.
- Protect people and take reasonable steps to prevent additional damage.
- Photograph the visible condition and begin a dated record.
- Contact the insurer or claims department as soon as practical.
- Ask what inspections, estimates, receipts, and other documents are needed.
- Keep notes of calls, emails, claim numbers, visits, and decisions.
Choosing a Roofing Contractor
Verify local business information, licensing requirements where applicable, liability coverage, and workers’ compensation arrangements. Request a written inspection report and itemized estimate, seek recent references, and compare more than one estimate when safety and timing allow. Be cautious of large upfront payment demands, guaranteed claim promises, or pressure to sign immediately after a storm.
What to Ask During a Roof Inspection
- What damage appears consistent with the recent storm?
- What may be older wear, prior damage, or maintenance-related deterioration?
- Which areas need immediate protection, and which repairs are permanent?
- Are flashing, ventilation, gutters, attic areas, and roof decking included?
- Can the findings and recommended scope of work be provided in writing?
Keep a Useful Claim and Repair File
Store policy details, before-and-after photos, reports, estimates, contracts, receipts, permits, warranties, invoices, emails, and call notes in one digital folder and one physical folder. A well-organized file makes it easier to track work, compare documents, and answer questions throughout the repair process.
Common Mistakes to Avoid
- Climbing onto a wet or unstable roof.
- Waiting too long to record visible damage.
- Discarding damaged materials before photographing them.
- Assuming every leak has the same cause.
- Signing contracts without reviewing payment terms and scope.
- Choosing a contractor solely because the price is lowest.
Conclusion
After a storm, a calm and methodical response can protect both the home and the homeowner’s options. Focus on safety, document the condition, prevent additional damage, review the policy, and use qualified professionals for inspection and repairs. Clear records and careful decisions can help turn a stressful situation into a manageable repair process.